1、环境说明
kibana、logstash
HQ-Kibana 10.2.2.60
elk服务器
HQ-ES01 10.2.2.61
HQ-ES02 10.2.2.62
HQ-ES03 10.2.2.63
由于是在虚拟化上进行的安装配置,在第一台上进行基础配置完成后,其他两台进行的克隆,实际生产环境采用物理机部署可以采用ansible等自动化配置工具批量进行配置,可以快速节约时间
1、基础环境准备工作
安装JDK环境,需要在三个节点安装,由于elasticsearch包内已经包括了jdk环境,也可以不用安装,但需配置JAVA_HOME
[root@HQ-ES01 ~]# rpm -ivh jdk-8u251-linux-x64.rpm
配置ES节点JAVA_HOME
[es@HQ-Elk01 app]$ vim ~/.bash_profile
JAVA_HOME=/app/elasticsearch-7.13.2/jdk/
export PATH=$JAVA_HOME/bin:$PATH
2、创建ES用户,由于elasticsearch不能以root的方式启动,需要创建用户并赋权。
[root@HQ-ES01 ~]# groupadd -g 1000 es
[root@HQ-ES01 ~]# useradd -u 1000 es -g es
3、创建app目录及es数据存放目录
[root@HQ-ES01 ~]# mkdir -p /app
[root@HQ-ES01 ~]# mkdir -p /data
[root@HQ-ES01 ~]# chown -R es:es /app
[root@HQ-ES01 ~]# chown -R es:es /data
4、下载es包
wget https://artifacts.elastic.co/downloads/elasticsearch/elasticsearch-7.13.2-linux-x86_64.tar.gz
解压到/app目录下
[es@HQ-ES01 app]$ tar -zxvf elasticsearch-7.13.2-linux-x86_64.tar.gz -c /app
5、设置系统参数
取消普通用户文件打开数
[root@HQ-ES01 ~]# vim /etc/security/limits.conf
* soft nofile 204800
* hard nofile 204800
* soft nproc 204800
* hard nproc 204800
设置系统底层参数,主要为tcp等配置,配置完成执行sysctl -p 或重新启动系统生效。
[root@HQ-ES01 ~]# vim /etc/sysctl.conf
#IPv6
net.ipv6.conf.all.disable_ipv6 = 1
net.ipv6.conf.default.disable_ipv6 = 1
#IPv4
vm.overcommit_memory = 1
net.ipv4.ip_local_port_range = 1024 65536
net.ipv4.tcp_fin_timeout = 1
net.ipv4.tcp_keepalive_time = 1200
net.ipv4.tcp_mem = 94500000 915000000 927000000
net.ipv4.tcp_syncookies=1
net.ipv4.tcp_tw_reuse = 1
net.ipv4.tcp_tw_recycle = 1
net.ipv4.tcp_fin_timeout=120
net.ipv4.tcp_keepalive_time = 2400
net.ipv4.tcp_max_syn_backlog = 8192
net.ipv4.tcp_max_tw_buckets = 5000
net.ipv4.tcp_timestamps = 0
net.ipv4.tcp_synack_retries = 1
net.ipv4.tcp_syn_retries = 1
net.ipv4.tcp_abort_on_overflow = 0
net.core.rmem_max = 16777216
net.core.wmem_max = 16777216
net.core.netdev_max_backlog = 262144
net.core.somaxconn = 262144
net.ipv4.tcp_max_orphans = 3276800
net.ipv4.tcp_max_syn_backlog = 262144
net.core.wmem_default = 8388608
net.core.rmem_default = 8388608
net.ipv4.netfilter.ip_conntrack_max = 2097152
net.nf_conntrack_max = 655360
net.netfilter.nf_conntrack_tcp_timeout_established = 1200
vm.max_map_count=262144
配置hosts,确保通过主机名可以正常解析es节点
10.2.2.61 hq-es01
10.2.2.62 hq-es02
10.2.2.63 hq-es03
6、配置elasticsearch配置及jvm设置,elasticsearch配置文件在程序config目录下
设置JVM HEAP SIZE,一般为系统一般内存,最大不超过31G,若主机内存较大可以配置为31G内存
[root@HQ-ES01 config]# vim jvm.options
################################################################
## IMPORTANT: JVM heap size
################################################################
##
## The heap size is automatically configured by Elasticsearch
## based on the available memory in your system and the roles
## each node is configured to fulfill. If specifying heap is
## required, it should be done through a file in jvm.options.d,
## and the min and max should be set to the same value. For
## example, to set the heap to 4 GB, create a new file in the
## jvm.options.d directory containing these lines:
##
## -Xms4g
## -Xmx4g
##
## See https://www.elastic.co/guide/en/elasticsearch/reference/current/heap-size.html
## for more information
##
################################################################
-Xmx8g
配置elasticsearch配置文件,三台配置如下:
HQ-ES01
#cluster.initial_master_nodes: ["hq-es01"]
此配置仅在第一次启动时配置,启动完成后需要注释掉,仅在主节点上配置即可,我这里是第一台ES节点。环境有限我这里三个节点承担master和data节点,若资源有限可以将master节点及data节点分开。
#集群名称 一个集群配置相同名称
cluster.name: hq-escluster
#节点名称 唯一每个节点不同
node.name: hq-es01
node.master: true
node.data: true
#配置集群可发现节点
discovery.seed_hosts: ["10.2.2.61:9300", "10.2.2.62:9300", "10.2.2.63:9300"]
#主节点配置
#cluster.initial_master_nodes: ["hq-es01"]
path.data: /data/elasticsearch/data
#本机IP
network.host: 10.2.2.61
transport.tcp.port: 9300
transport.tcp.compress: true
http.port: 9200
http.max_content_length: 100mb
http.cors.enabled: true
http.cors.allow-origin: "*"
http.cors.allow-headers: Authorization
HQ-ES02
#集群名称 一个集群配置相同名称
cluster.name: hq-escluster
#节点名称 唯一每个节点不同
node.name: hq-es02
node.master: true
node.data: true
#配置集群可发现节点
discovery.seed_hosts: ["10.2.2.61:9300", "10.2.2.62:9300", "10.2.2.63:9300"]
#主节点配置
#cluster.initial_master_nodes: ["hq-es01"]
path.data: /data/elasticsearch/data
#本机IP
network.host: 10.2.2.62
transport.tcp.port: 9300
transport.tcp.compress: true
http.port: 9200
http.max_content_length: 100mb
http.cors.enabled: true
http.cors.allow-origin: "*"
http.cors.allow-headers: Authorization
HQ-ES03配置
#集群名称 一个集群配置相同名称
cluster.name: hq-escluster
#节点名称 唯一每个节点不同
node.name: hq-es03
node.master: true
node.data: true
#配置集群可发现节点
discovery.seed_hosts: ["10.2.2.61:9300", "10.2.2.62:9300", "10.2.2.63:9300"]
#主节点配置
cluster.initial_master_nodes: ["hq-es01"]
#path.data: /data/elasticsearch/data
#本机IP
network.host: 10.2.2.63
transport.tcp.port: 9300
transport.tcp.compress: true
http.port: 9200
http.max_content_length: 100mb
http.cors.enabled: true
http.cors.allow-origin: "*"
http.cors.allow-headers: Authorization
7、将elasticsearch注册成服务,保存后执行systemctl deamon-reload记载服务,服务器不建议配置为自启动。
vim /usr/lib/systemd/system/elasticsearch.service
[Unit]
Description=elasticsearch
After=network.target
[Service]
Type=forking
User=es
ExecStart=/app/elasticsearch-7.13.2/bin/elasticsearch -d
PrivateTmp=true
# 指定此进程可以打开的最大文件数
LimitNOFILE=65535
# 指定此进程可以打开的最大进程数
LimitNPROC=65535
# 最大虚拟内存
LimitAS=infinity
# 最大文件大小
LimitFSIZE=infinity
# 超时设置 0-永不超时
TimeoutStopSec=0
# SIGTERM是停止java进程的信号
KillSignal=SIGTERM
# 信号只发送给给JVM
KillMode=process
# java进程不会被杀掉
SendSIGKILL=no
# 正常退出状态
SuccessExitStatus=143
8、以上配置完毕后即可执行elasticsearch启动
依次启动HQ-ES01、HQ-ES02、HQ-ES03
systemctl start elasticsearch
启动完成后访问http://10.2.2.62:9200/_cat/nodes可以查看节点状况,可以看到三个节点都已经注册上来了。
10.2.2.62 23 69 0 0.08 0.16 0.13 cdfhilmrstw - hq-es02
10.2.2.63 25 70 1 0.17 0.09 0.06 cdfhilmrstw * hq-es03
10.2.2.61 51 68 0 0.01 0.04 0.05 cdfhilmrstw - hq-es01
 9、修改主节点1的配置文件将
#主节点配置
#cluster.initial_master_nodes: ["hq-es01"]注释掉
kibana安装配置
1、安装JDK
[root@HQ-Kibana ~]# rpm -ivh jdk-8u251-linux-x64.rpm
2、创建kibana目录及用户
[root@HQ-Kibana ~]# mkdir -p /app
[root@HQ-Kibana ~]# groupadd elk
[root@HQ-Kibana ~]# useradd elk -g elk
[root@HQ-Kibana ~]# chown -R elk:elk /app
3、解压kibana安装包
[root@HQ-Kibana ~]#wget https://artifacts.elastic.co/downloads/kibana/kibana-7.13.2-linux-x86_64.tar.gz
[root@HQ-Kibana ~]tar -zxvf kibana-7.13.2-linux-x86_64.tar.gz
4、修改kibana配置,增加以下配置即可,其他默认
[elk@HQ-Kibana ~]$ vim /app/kibana-7.13.2/config/kibana.yml
server.host: 0.0.0.0
elasticsearch.hosts: ["http://10.2.2.61:9200","http://10.2.2.62:9200","http://10.2.2.63:9200"]
i18n.locale: "zh-CN"
启动kibana程序
[elk@HQ-Kibana ~]$ ./app/kibana-7.13.2/bin/kibana &
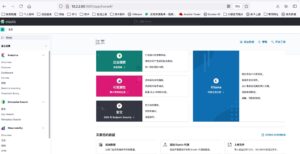
5、打开kiban界面查看是否正常启动
9、修改主节点1的配置文件将
#主节点配置
#cluster.initial_master_nodes: ["hq-es01"]注释掉
kibana安装配置
1、安装JDK
[root@HQ-Kibana ~]# rpm -ivh jdk-8u251-linux-x64.rpm
2、创建kibana目录及用户
[root@HQ-Kibana ~]# mkdir -p /app
[root@HQ-Kibana ~]# groupadd elk
[root@HQ-Kibana ~]# useradd elk -g elk
[root@HQ-Kibana ~]# chown -R elk:elk /app
3、解压kibana安装包
[root@HQ-Kibana ~]#wget https://artifacts.elastic.co/downloads/kibana/kibana-7.13.2-linux-x86_64.tar.gz
[root@HQ-Kibana ~]tar -zxvf kibana-7.13.2-linux-x86_64.tar.gz
4、修改kibana配置,增加以下配置即可,其他默认
[elk@HQ-Kibana ~]$ vim /app/kibana-7.13.2/config/kibana.yml
server.host: 0.0.0.0
elasticsearch.hosts: ["http://10.2.2.61:9200","http://10.2.2.62:9200","http://10.2.2.63:9200"]
i18n.locale: "zh-CN"
启动kibana程序
[elk@HQ-Kibana ~]$ ./app/kibana-7.13.2/bin/kibana &
5、打开kiban界面查看是否正常启动

文章评论